Repairing scratched hardwood floors is a common DIY project tackled by homeowners seeking to restore their homes’ beauty and value. Imagine the warmth and charm of a beautifully polished hardwood floor, but with unwelcome scratches marring its surface. Hardwood floors are a significant investment, and proper care and maintenance are essential to preserve their aesthetic appeal. This comprehensive guide will walk you through the process of repairing scratched hardwood floors, addressing common concerns and providing actionable solutions, regardless of the scratch’s severity. This article is structured to cover everything from minor scratches to significant damage. We’ll detail the necessary tools and materials, show you various repair methods, and even offer preventative maintenance tips.
Identifying the Type of Scratch
Assessing the Damage
Before you start repairing scratched hardwood floors, meticulously assess the extent of the damage. This initial step determines the best course of action. Different types of scratches require different repair techniques. A minor, shallow scratch might only require filling, while deeper gouges may necessitate more substantial measures such as sanding and refinishing. Proper identification of the scratch’s depth and width is critical for an effective repair. Consider the location of the scratches too; scratches near high-traffic areas might need more robust repair options than those in less frequented spaces. A professional assessment is always recommended for significant structural damage.
Choosing the Right Repair Method
For minor scratches, wood filler or epoxy can effectively mask the damage. However, deeper scratches may require a more involved process. Sanding and refinishing are essential for restoring the floor’s smooth surface and concealing deeper damage. Professional sanding and refinishing might be necessary to achieve the desired aesthetic. Furthermore, specialized wood-repair products cater to different degrees of damage, each with its own process and considerations. By understanding the different options available, you can tackle your repair project with precision and confidence.
Choosing the Right Materials
Selecting the Appropriate Wood Filler
Choosing the correct wood filler is crucial for successful repairs. Look for a wood filler that matches the color and grain of your hardwood floors. Experiment with a small, inconspicuous area to ensure a perfect color match before proceeding. Different wood fillers have different application methods and drying times, so careful consideration of these factors is important for achieving optimal results. Furthermore, high-quality wood filler is essential for long-lasting repair and resilience.
Essential Tools and Supplies
Essential tools for repairing scratches include a wood filler, a putty knife, sandpaper, a sanding block, and a cleaning solution. Safety equipment, such as dust masks and gloves, is also necessary. Additional tools, like a wood scraper or a drill, can be helpful depending on the severity of the damage. Ensure the tools you select are appropriate for the job at hand. Following safety procedures can mitigate risks.
Repairing Minor Scratches
Filling Minor Scratches
For minor scratches, wood filler is often the best option. Apply the filler to the scratch using a putty knife, ensuring even coverage. Allow the filler to dry completely according to the product instructions. Once dry, sand the area with fine-grit sandpaper to smooth it out. Carefully blending the filler with the surrounding wood is crucial to achieve a seamless appearance. The sanding process should be meticulous, and the focus should be on eliminating any visible traces of the filler.
Finishing Touches
Once the filler is thoroughly dry, use fine-grit sandpaper to create a smooth finish. Sanding should be done gently and methodically to avoid marring the surrounding wood. This part requires precision and patience. Apply a wood sealant to protect the repaired area and enhance its resilience to future scratches. Thoroughness at this stage is essential to obtain long-lasting results. Following the manufacturer’s guidelines for sanding and sealing is vital.
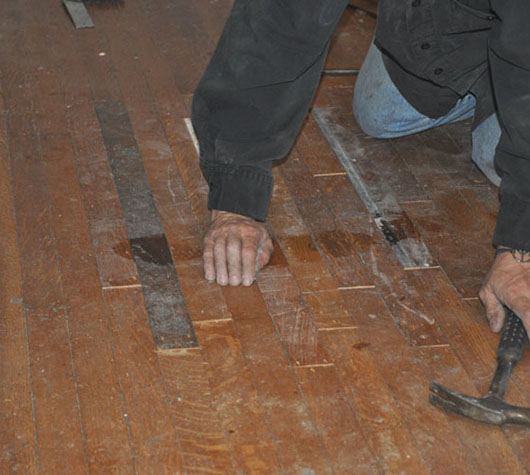
Repairing Deeper Scratches
Sanding and Refinishing
Deeper scratches may necessitate more significant repairs. In these cases, sanding and refinishing are often necessary. A power sander can be used to smooth out deeper scratches, taking care not to gouge the surrounding wood. Use progressively finer grits of sandpaper to achieve a smooth surface. Refinishing your hardwood floors after significant repair or restoration is a great step to completely restore the original state.
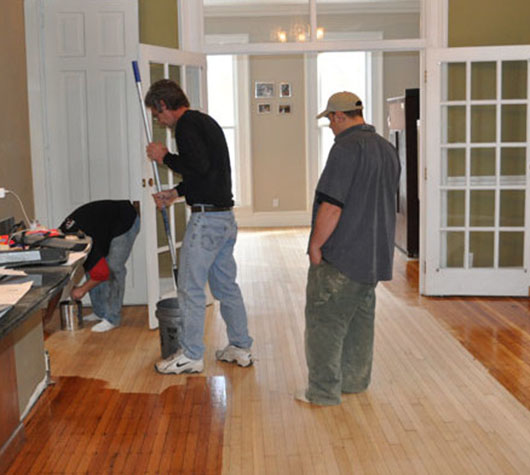
Restoring the Original Shine
After sanding, apply multiple coats of finish. This could be varnish, polyurethane, or oil. Allow each coat to dry completely before applying the next. This will protect the repaired area and give the floor a gleaming finish. This process is crucial for bringing the hardwood floors back to their previous condition. Consider the floor finish type to determine the appropriate method of application and drying time.
Preventative Maintenance
Protecting High-Traffic Areas
To prevent future scratches, protect high-traffic areas with rugs or mats. These can provide a cushion against furniture and foot traffic. Choosing appropriate mats for high-traffic areas can greatly reduce future damage. Use furniture pads to avoid damage from moving furniture or objects against the hardwood floor.
Regular Cleaning
Regular cleaning and maintenance can help preserve your hardwood floors. Avoid harsh chemicals and abrasive cleaners that can damage the finish. Use a damp mop and a cleaning solution specifically designed for hardwood floors. This simple act can maintain the beauty of your floors over time.
In conclusion, repairing scratched hardwood floors can be a rewarding DIY project if you follow the right steps and choose the right materials. By understanding the different types of scratches and employing the appropriate repair techniques, you can restore your floors to their former glory. Remember to prioritize safety and accuracy throughout the process. Consider professional help for more extensive damage. Ready to tackle your scratched hardwood floors? Visit our website for more in-depth guides and repair options!